REVIEW · SRINAGAR
The Best Monsoon Trek: Kashmir Great Lakes
Book on Viator →Operated by Himalaya Shelter · Bookable on Viator
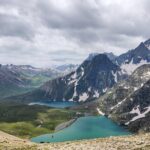
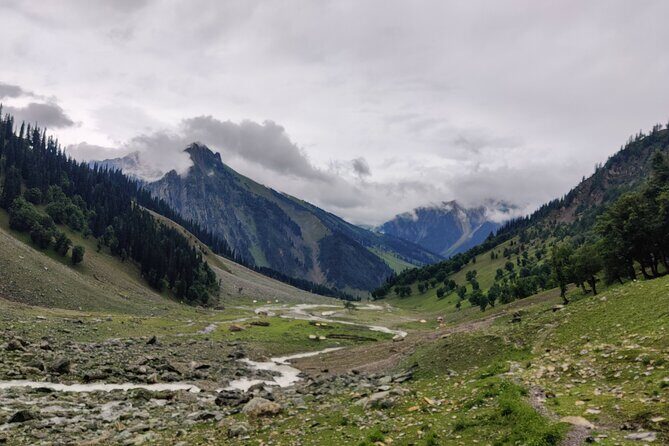
Snow and flowers share the same trail. That mix is why the Kashmir Great Lakes trek in this season feels so special: you’re chasing high-altitude snow while walking through fresh meadows that turn on like a switch. The route also stacks the days with clear altitude moments—Nichinai Pass, Gadsar Pass, and Zaj Pass—so you always know what kind of effort is coming next.
Two things I really like: first, the camp setup is properly handled with double-occupancy standard tents plus sleeping bags and mats, so you’re not improvising at altitude. Second, the team’s food reputation is strong, including mountain-style trout dishes and hearty soups that actually make sense after long hours on steep trails. The main drawback to plan around is weather: rain can hit hard, especially as the season matures, and this trek needs good conditions to run smoothly.
In This Review
- Key highlights you’ll care about
- How the July monsoon window shapes what you’ll see
- Srinagar to Sonamarg: getting your bearings (and your legs) on Day 1
- Shitkadi to Nichinai: maple meadows and a stream-guided rhythm
- Nichinai Pass (~4,100 m) to Vishansar: the climb has a payoff
- Vishansar to Gadsar via Gadsar Pass (~4,210 m): the toughest day of the week
- Gadsar to Tarsar Lake: a more relaxed day that still earns your views
- Zaj Pass to Gangabal: lower than before, but still high altitude
- Gangabal to Naranag: the long descent that shapes your last day
- What you really get for around $481
- Camps and tents: what “standard” means at altitude
- Who the guide team is built for (and what that means for safety)
- Fitness reality check: moderate means you still need grit
- Food and comfort: why the mountain meals matter more than you think
- Should you book the Kashmir Great Lakes trek?
- FAQ
- Where does the trek start and end?
- When does it start each day and what’s the meeting time?
- How long is the trek?
- What’s included with the tent camping?
- What meals are included?
- Is a porter included?
- Can the trek handle service animals?
- What if the weather is poor?
Key highlights you’ll care about
- Snow-to-flower timing in July: early July can show snow above and blooming meadows below.
- Big pass days, but paced well: several climbs with clear pass altitudes to anchor your expectations.
- Food support at altitude: from hot soups to trout dishes, meals are a real part of the experience.
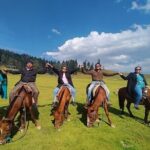
- Small groups: maximum 11 travelers, and some departures run around 10.
- Professional safety net: BMC-certified, mountaineering-qualified guides with a first-aid kit.
How the July monsoon window shapes what you’ll see
This trek is at its most photogenic when the season is mid-transition. Early July can still hold snow on higher reaches while meadows begin their fresh bloom below. If you want that contrast—snow-covered slopes with green foreground—this is the moment to aim for.
By late July, snow melts away and the meadows push into fuller bloom. Days can feel warmer, and that matters because you’ll be camping at altitude. Then late August brings cooler temperatures, flowers start to wither, and weather gets more unpredictable; abrupt rainfall is specifically noted for this time period. By the second week of September, the trek can still run before snow starts taking over the higher places again.
So here’s the practical takeaway: if you want more snow in the mix, plan earlier. If you want maximum flower show and less snow travel, push toward late July. If you’re comfortable with rain and colder nights, late August to early September can be dramatic—just understand it’s also more variable.
You can also read our reviews of more tours and experiences in Srinagar.
Srinagar to Sonamarg: getting your bearings (and your legs) on Day 1
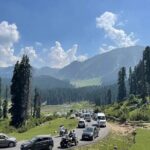
Day 1 is a drive story with scenery hints that set expectations for the whole trek. You leave Srinagar around 1 PM and reach Sonamarg by about 4:30 PM. The route follows the Sind River, and you’ll pass the Wayil bridge (about 25 km ahead of Srinagar).
On the way, there’s also a quick sight of Anchar lake of Srinagar. It’s not the main event, but I like that you’re not thrown straight into hours of trekking right away. You get a proper ramp-up: seated time, river valley views, and time for the group to get to know each other before the trail starts.
If you’re prone to feeling stiff after driving, do a little stretching during breaks. Also keep your first-day pace relaxed—Day 2 begins actual trekking with a steady effort.
Shitkadi to Nichinai: maple meadows and a stream-guided rhythm

Day 2 starts from camp at Shitkadi and goes toward Nichinai camp. The trail follows the Nichinai stream on your right throughout the day, which is a nice mental anchor: you always have a reference point and a sense of direction rather than a “where are we exactly?” feeling.
After about 1.5 km upstream, you hit a meadow dotted with maple trees. This is the kind of soft scenery that makes a big difference on a trekking day—especially when you’re already adjusting to altitude and your body is learning how to pace itself.
This day is also a reminder that the Great Lakes trek isn’t just about the biggest peaks. It’s also about the in-between: stream corridors, meadows, and terrain that gradually builds your confidence. If your goal is to enjoy the journey, Day 2 is a good match.
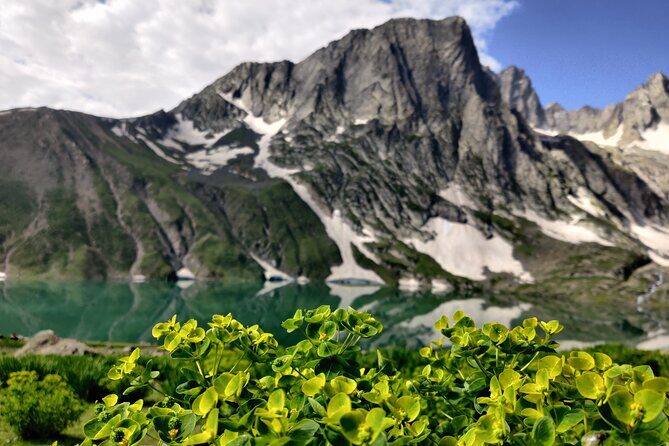
Nichinai Pass (~4,100 m) to Vishansar: the climb has a payoff
Day 3 is where the trek starts feeling more serious. You leave Nichinai camp and head up to Nichinai Pass, at around 4,100 meters. The ascent takes a couple of hours at a moderate pace, so it’s not a “rush until you collapse” day, but you should still expect effort.
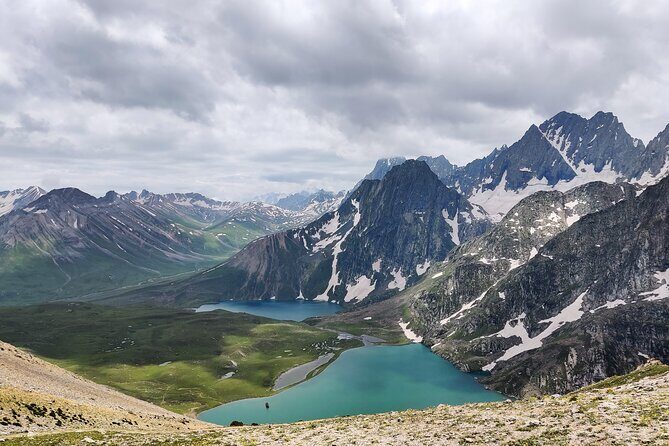
Once you cross over the pass, you’re set up for lake scenery at Vishansar. This is a common pattern on the trek: work for the view, then slow down and let the lake pull you in.
Practical note for your comfort: at this elevation, the air can feel sharp even if daytime temperatures are reasonable. Pack for layers and be ready for wind exposure around pass zones.
Vishansar to Gadsar via Gadsar Pass (~4,210 m): the toughest day of the week
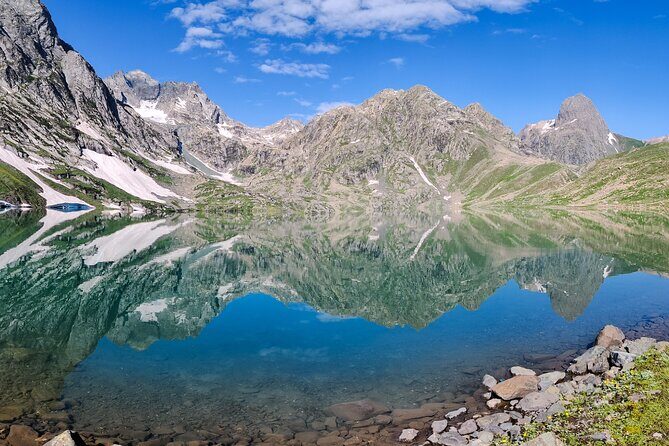
Day 4 is described as beautiful but demanding, and the numbers back that up. Today crosses the highest point of the entire trek at Gadsar Pass, at about 4,210 meters.
You start from Vishansar and push up and over, with the pass being the headline. After that, you keep moving toward Gadsar Lake. This day is the one I’d plan around mentally. If you’re the type who gets discouraged by long climbs, remind yourself: the trek is designed with major passes distributed across the week, and this is the peak grind.
Also watch for stamina timing. You want to keep a steady breathing rhythm on the ascent, not sprint and then pay for it later on the descent approach. The reward at the end is the lake-and-camp cycle that keeps you motivated for the next day.

Gadsar to Tarsar Lake: a more relaxed day that still earns your views
Day 5 shifts gears and is called relatively easier compared to other trek days. You hike from Gadsar toward Satsar area (with Tarsar Lake as the focal stop), starting with an initial steep hike for just over an hour.
After that, the trail becomes gradual and mostly level plain. That change of rhythm is a big quality-of-life improvement after two hard pass days. Your legs still work, but you can settle into a smoother cadence.
This is also a good day for enjoying the trail details you might miss earlier. When you’re not constantly fighting steep grade, you notice the small turns of terrain and the way the air feels different as the trail opens up.
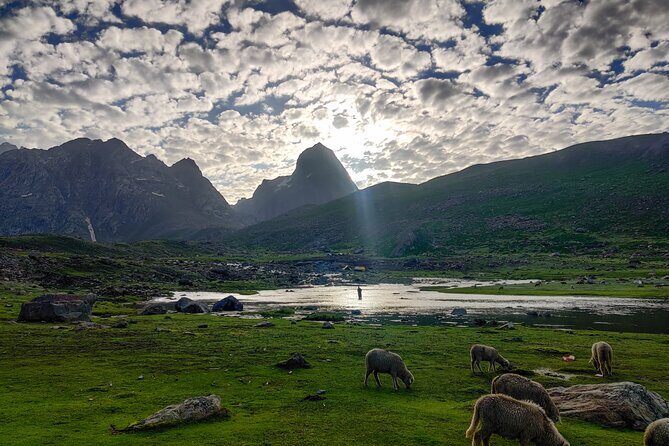
Zaj Pass to Gangabal: lower than before, but still high altitude
Day 6 brings another pass moment—Zaj Pass—on the way to Gangabal Lake. Zaj Pass is comparatively lower than the former two passes, but the altitude is still serious: about 13,280 feet. The ascent takes around two hours to reach the pass.
From there, you continue toward Gangabal Lake and settle in for camp. This day is a good checkpoint for how your body is handling altitude by midweek. If you’ve paced well on Day 4, you’ll likely find this one more manageable. If you pushed too hard earlier, you’ll feel it here.
Weather matters even more on this day because sudden rain is a known risk in the broader season window. If rain starts building, keep your focus on footing and your pace—not on forcing the timetable.
Gangabal to Naranag: the long descent that shapes your last day
Day 7 is where the trek finishes with one big payoff: you start from Gangabal and the trail oscillates between minor ascents and descents for about half the day. After that, there’s a steep descent all the way to Naranag.
This is the classic end-of-trek pattern. It’s not the highest altitude of the route, but it can be tough on knees and calves because steep downhill changes how your muscles work. Start slow on the descent. Shorten your steps if you need to. Take advantage of any safe slow-down moments the guide suggests.
You arrive back in Srinagar between 5 and 7 PM, depending on when you started from Gangabal. So plan for a late return day—once you’re done, your job is recovery, not sightseeing sprinting.
What you really get for around $481
At $481 for an approximately 7-day trek, the value comes from how much is bundled. You’re not just paying for a trail. You’re paying for a full camping operation plus a certified guide team.
Included are 6 nights of standard tent stay with double occupancy, along with the full setup: kitchen, dining, toilet tent with portable seats, and camping stools. You also get clean sleeping bags and mats, which is huge for comfort when nights are cold or damp.
Meals are part of the deal too: 6 breakfasts, 5 lunches, and 6 dinners. And this is where the reviews line up with real trek logic. After high passes, you don’t want to play “what can I buy near the trail.” You want hot food that actually sticks with you. The standout praise includes soups and dals/rajma-style comfort foods, plus trout dishes on the mountain.
You also get transport support on the Srinagar onward portion, plus all fees and taxes. On group size, the cap is 11 travelers. In practice, some departures run with around 10, which tends to make the trek feel easier to manage on narrow sections and around camp.
The main cost consideration: porter service for personal luggage isn’t included. It’s listed at INR 500 per bag (under 12) per day. If you carry too much yourself, your trek experience can turn into a logistics problem instead of a hiking day.
Camps and tents: what “standard” means at altitude
The trek uses good quality A-frame style tents, with a kitchen and dining tent plus a dedicated toilet setup. You’ll sleep with sleeping bags and mats provided, which means you can pack lighter than you would for an unsupported trek.
Double occupancy is standard here, so you’ll share tent space with a partner. If you’re traveling solo, you’ll still be part of that pairing system, and it can be pleasant if you’re okay with basic tent life.
One more thing I like: there are portable seats and stools included, which sounds minor until you’ve spent hours on uneven trail and want a place to sit without immediately collapsing on the ground.
This is camping. It’s not a hotel. But the setup aims to be functional enough that you can recover and go again the next day.
Who the guide team is built for (and what that means for safety)
This trek is led by mountaineering qualified and BMC certified professional trek guides, and they carry a first-aid kit. That matters because high passes plus unpredictable weather can turn a “pretty hike” into a safety issue fast.
From the feedback, I saw repeated praise for specific leaders—Surendra Rana is named for being alert and vigilant, and Rishabh is praised for getting a group down safely when conditions turned bad. Other team members like Bachan and Choudhary also come up in connection with food and overall team support.
If you’re the kind of traveler who values “someone has this under control,” this is a big reason to consider this operator. You’re not left guessing how to handle weather shifts, trail conditions, or timing on pass days.
Fitness reality check: moderate means you still need grit
The stated requirement is moderate physical fitness. Translation: you should be comfortable walking for 4–10 hours on mountainous terrain, including steep sections and high passes.
A good way to judge fit is to look at the day structure. Some days are 4–6 hours, others stretch to longer, demanding sessions. Pass days include several hours of ascent. Even on the “easier” day, you start with a steep climb for about an hour.
If you train for hills, stairs, and longer walks, you’ll likely find this manageable. If your exercise routine is mostly flat walks, start now. Also practice how you handle downhill—because the last day includes a steep descent that can be the hardest on your body.
Food and comfort: why the mountain meals matter more than you think
Food is a standout part of this trek, and it’s not just nice-to-have. On a multi-day trek with tents and pass altitude, meals are what keep energy stable and moods steady.
The reviews mention hot, steaming soups, dals, rajma, pasta, and even trout dishes served on the mountain. That tells me the kitchen isn’t treating meals as a check-the-box task. They’re building meals that work with cold conditions and heavy effort.
Also, you’ll have consistent meal timing across most days: breakfast every day (6), dinner every day (6), and lunch on 5 days. Consistency helps you manage your daypack snack strategy too.
If you have dietary needs, the data you provided doesn’t list specific options, so you should ask before booking. But for most people, the included menu approach means you can hike without turning every stop into a hunger emergency.
Should you book the Kashmir Great Lakes trek?
I’d book this if you want a classic Great Lakes trek experience with real support behind it: certified guides, proper camp infrastructure, and food that has a proven reputation. The small group size cap (up to 11) also makes it easier to feel like a team rather than a moving crowd.
I would hesitate if you’re sensitive to weather swings. Late July can be warm and flower-heavy, but late August and beyond can bring abrupt rainfall and colder nights, and the trek needs good weather to run as planned. Also, if you don’t want to carry much, remember that porter service is extra.
If you’re aiming for the best mix of snow and bloom, target early July. If you want the meadows at their most lush, aim later in July. Either way, come prepared for high altitude effort and a steady rhythm of climb, lake, and camp.
FAQ
Where does the trek start and end?
The trek starts in Srinagar and ends back at the meeting point (also Srinagar). On the last day, you return to Srinagar between about 5 and 7 PM.
When does it start each day and what’s the meeting time?
The meeting point start time is listed as 11:00 am.
How long is the trek?
The duration is listed as 7 days approximately.
What’s included with the tent camping?
You get 6 nights in standard tent stay with double occupancy. Tents include a kitchen, dining, and toilet tent setup, plus portable seats and camping stools. Clean sleeping bags and mats are also included.
What meals are included?
You get 6 breakfasts, 5 lunches, and 6 dinners.
Is a porter included?
No. A porter to carry personal luggage is not included. The listed porter charge is INR 500 per bag (under 12) per day.
Can the trek handle service animals?
Yes. Service animals are allowed.
What if the weather is poor?
This experience requires good weather. If it’s canceled due to poor weather, you’ll be offered a different date or a full refund.